
Switching to a digital fax solution like WebFax can transform your communication workflow, making it simpler and more efficient while maintaining the reliability of traditional faxing. With TeleCloud's WebFax portal, you can send, receive, and manage faxes seamlessly, all through an intuitive online interface.
Whether you're new to WebFax or want to maximize its capabilities, this guide walks you through everything from getting started to troubleshooting common issues. By the end, you’ll know exactly how to navigate the WebFax portal, optimize advanced features, and address potential challenges, ensuring a smooth, secure, and efficient faxing experience.
Getting Started: Accessing the TeleCloud WebFax Portal
Step 1: Locate the WebFax Portal
- Go to telecloud.net
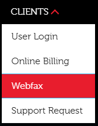
- In the TeleCloud main navigation menu, you can find the WebFax portal under the client dropdown menu.
Step 2: Log In to the Portal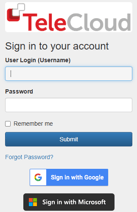
- Navigate to secure.ipfax.net.
- Use your email address and password to log in. For first-time users, enter the temporary password provided by TeleCloud and update it to something secure.
- Choose the "User Login" option. (Reseller and admin logins are reserved for advanced troubleshootin

Step 3: Explore Your Dashboard
Once logged in, you'll land on the user dashboard. Here, you can:
- View fax activity (sent and received faxes).
- Adjust account settings.
- Send faxes through the portal.
Key Features of the TeleCloud WebFax Portal
1. Sending a Fax
The WebFax portal makes sending faxes easy:
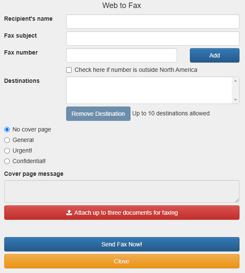
- Navigate to the Send Web to Fax section.
- Fill out the recipient’s name and fax number (the portal automatically formats numbers correctly, adding necessary prefixes).
- Add a subject line to identify the fax.
- Attach up to three documents (PDF, Word, etc.).
- Select an optional cover page and include a personalized message.
- Click Send Fax Now. You’ll receive an email confirmation once the fax is sent.
Pro Tip: Use the portal to send a single fax to up to 10 recipients simultaneously, saving time on high-volume communications.
2. Viewing Fax Activity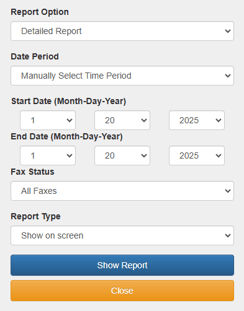
In the Fax Activity Report section, you can:
- Check the status of sent faxes (e.g., successful, failed).
- Review inbound faxes received through email or the portal.
- Filter results by date, recipient, or fax number for up to 31 days.
- Resend faxes by entering a new recipient or downloading a copy for your records.
3. Managing Your Account
- Account Balances: Monitor your monthly fax limits. (Standard accounts allow 100 outbound faxes per user, with unlimited inbound faxes.)
- Email Preferences: Update your email address for fax delivery or switch between email and physical fax machine delivery.
- Custom Workflow Settings: Adjust preferences to fit your team’s needs, such as hybrid setups with both digital and machine-based faxing.
Advanced Features to Streamline Your Workflow
- Email Integration: Send faxes directly from your email by attaching documents and entering the recipient’s fax number in the email field. This is particularly useful for remote teams or employees who prefer email-based workflows.
- Custom Workflows: Tailor the portal to your needs. For example, legal teams can set up specific cover pages for client communications, while healthcare providers can integrate encrypted options for compliance.
- Seamless Formatting: The portal corrects common input errors (e.g., missing prefixes), ensuring faxes are sent without delays.
Troubleshooting Common Issues
1. Failed Faxes
- Cause: Incorrect fax numbers, connectivity issues, or reaching the recipient's storage limit.
- Solution: Check the Fax Activity Report for error messages. If unresolved, contact TeleCloud support for assistance.
2. Login Problems
- Cause: Incorrect password or user type selection.
- Solution: Ensure you’re selecting "User Login" and using the updated password. If the issue persists, reset your password or reach out to support.
3. Reaching Fax Limits
- Cause: Exceeding your monthly outbound fax quota.
- Solution: Contact TeleCloud to temporarily or permanently increase your fax allocation.
4. Internet Connectivity Loss
- Impact: Delayed fax delivery.
- Solution: Faxes queued during downtime will be sent once the connection is restored.
Empower Your Communication with TeleCloud WebFax
The TeleCloud WebFax portal isn’t just a tool—it’s a game-changer for businesses looking to modernize their communication workflows. By combining the reliability of traditional faxing with the convenience and flexibility of digital solutions, WebFax enables you to send, receive, and manage faxes effortlessly. Whether you’re optimizing for efficiency, meeting compliance standards, or simply making communication seamless, the WebFax portal adapts to your needs.
With its user-friendly interface, advanced features, and robust support, TeleCloud ensures your faxing process is no longer a burden but a business advantage. Don’t let outdated technology hold you back.
Ready to take the next step? Contact TeleCloud today to discover how WebFax can transform your communication, saving time, cutting costs, and improving the way your business operates. Let’s modernize your faxing, together.
Commonly Asked Questions
How secure is the WebFax portal?
TeleCloud offers encryption options like TLS and SRTP to meet industry standards, ensuring secure communication for industries like healthcare and legal services.
What file types can I attach to a fax?
Supported formats include PDF, Word, and image files. Each fax can include up to three attachments.
What happens if the internet goes down?
Faxes are queued and sent automatically once connectivity is restored, ensuring no documents are lost.
Can I adjust user limits for faxing?
Yes, outbound limits can be customized based on your business needs. Contact TeleCloud for adjustments.
How does email integration work?
You can send faxes directly from your email by attaching documents and entering the recipient's fax number in the email field.
Topics:


