Switching to a new VoIP provider can feel like a big move, especially when you want to keep your existing phone numbers without risking service interruptions. Downtime is a top concern for businesses that rely heavily on phone communications to handle customer service, sales, or day-to-day operations. A single missed call during the transition could mean a lost sale or a frustrated client.
That’s why number porting matters. It’s more than just a technical task, it’s a strategic step in your migration that directly impacts your customer experience and internal workflows. Knowing how to do it right ensures a seamless transition with no surprises.
At TeleCloud, we help businesses like yours navigate this process every day. We know the pitfalls to avoid, the steps that matter, and the details that make the difference.
In this guide, we’ll walk you through everything you need to know, from understanding what porting is to preparing for go-live without disruption. Let’s dive in and set your business up for success.
What Is Number Porting and Why Does It Matter?
Number porting is the process of moving your existing phone numbers from one provider to another. Whether you’re switching from a traditional carrier like Verizon or another VoIP platform, porting ensures your customers can still reach you without having to update their contact lists or internal systems.
It’s not just about convenience, it’s about continuity. If your number isn’t ported correctly, you risk downtime, missed calls, and damaged customer relationships. And since phone numbers are often tied to your brand identity, keeping them intact is essential to preserving trust and recognition.
Number porting also enables you to consolidate providers and upgrade your communication technology. It helps streamline operations without sacrificing your existing infrastructure, giving you more control and flexibility across your business.
What Information Do You Need to Port Your Numbers?
Successful number porting starts with having accurate, complete information. If anything is off, even by one character, your port request can be delayed or rejected.
Here’s what you need:
- Account Number: Must match what’s on file with your current provider. This can vary across locations and may involve sub-accounts.
- Service Address: The physical location associated with the phone numbers, not the billing address.
- Account Name: Needs to be spelled exactly as it appears on your invoice; even minor differences can cause issues.
- Billing Telephone Number (BTN): This main number identifies your account. It’s especially important for legacy providers.
- Authorized User: This must be someone who can legally approve the port. Outdated contacts (e.g., former employees) often cause delays.
- PIN Code: Some carriers require a PIN for added security. An incorrect or missing PIN can result in rejection.
- List of Numbers to Port: You may not want to port every number on the account. Be clear about which numbers you’re moving.
Providing a current invoice from your losing provider helps confirm this information—though it’s surprising how often critical details like the account name or service address are overlooked. Double-checking these fields can prevent delays and disputes.
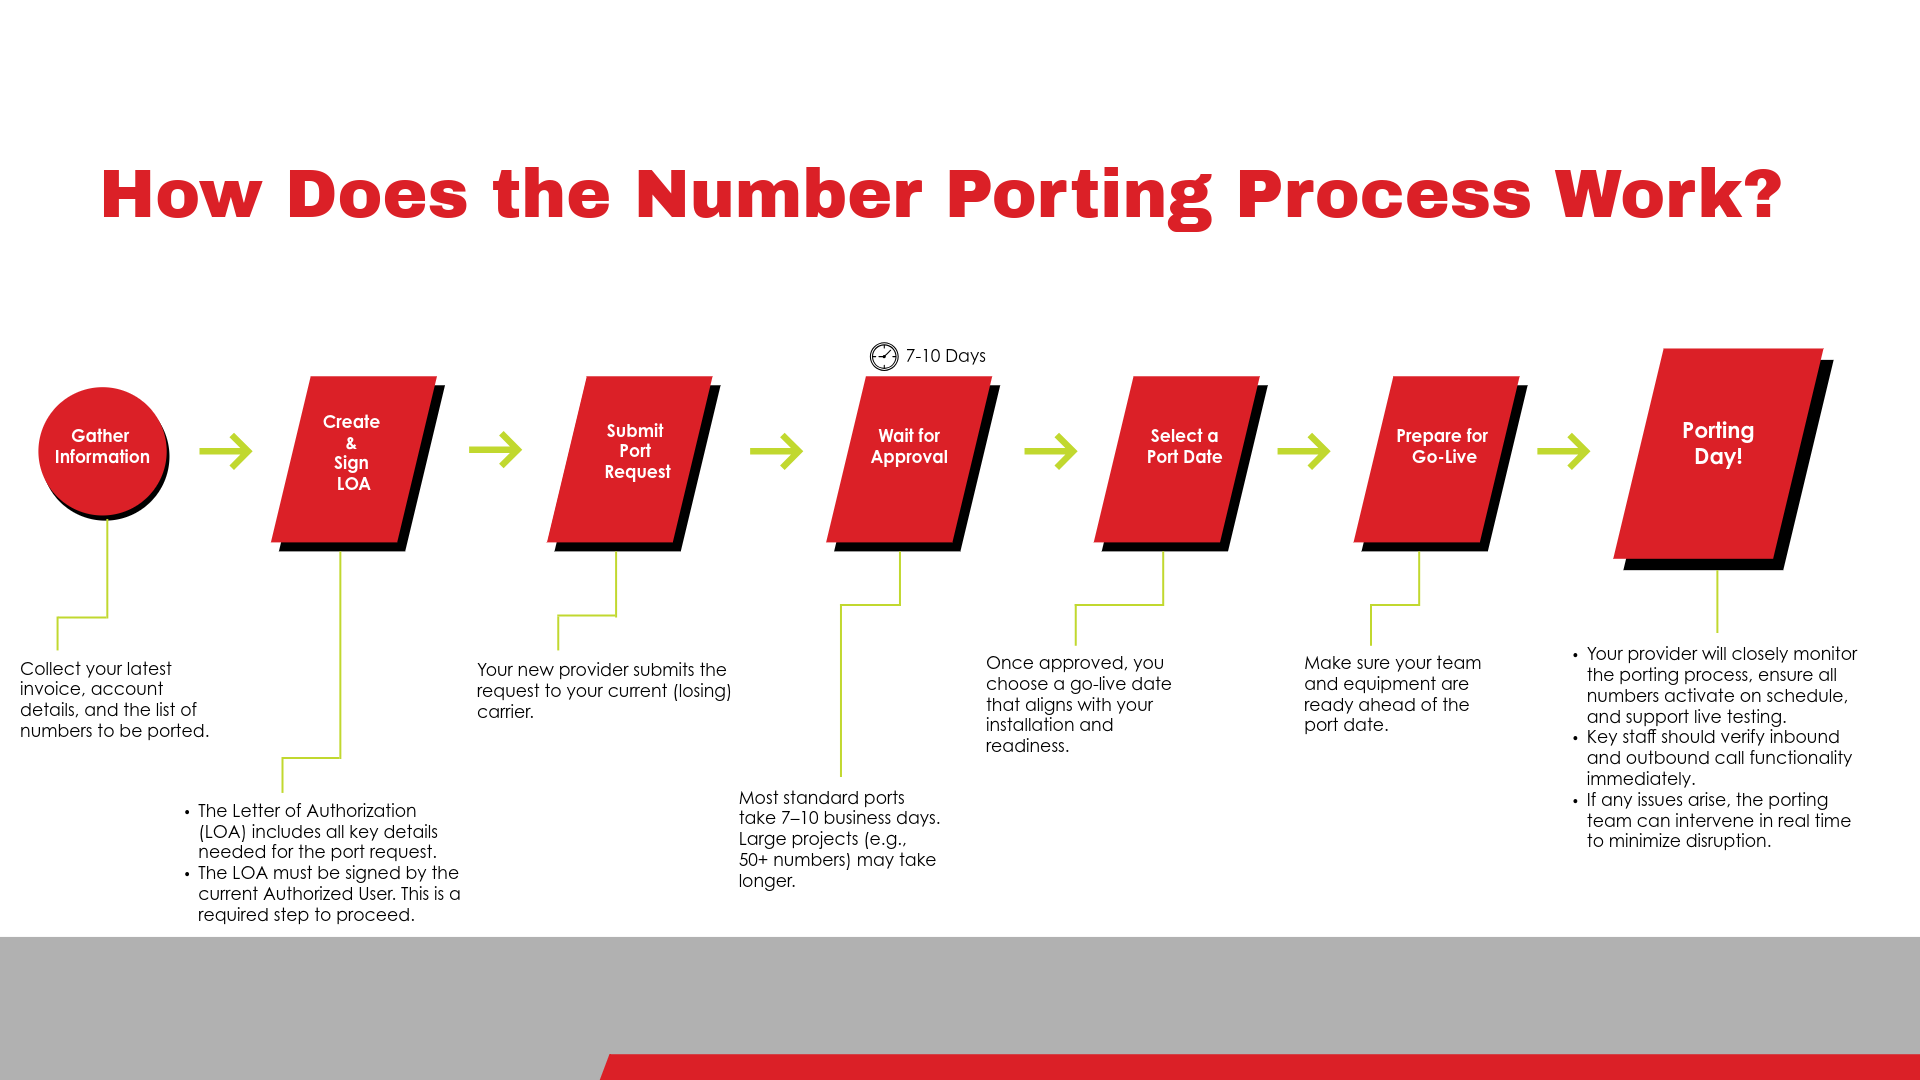
 How Does the Number Porting Process Work?
Understanding the full process ahead of time helps reduce surprises and ensures a smoother transition. Here’s a detailed step-by-step breakdown of how porting typically works:
- Gather Documentation: Collect your latest invoice, account details, and the list of numbers to be ported.
- Create the LOA: The Letter of Authorization (LOA) includes all key details needed for the port request.
- Get It Signed: The LOA must be signed by the current Authorized User. This is a required step to proceed.
- Submit the Request: Your new provider submits the request to your current (losing) carrier.
- Wait for Approval: Most standard ports take 7–10 business days. Large projects (e.g., 50+ numbers) may take longer.
- Select a Port Date: Once approved, you choose a go-live date that aligns with your installation and readiness.
- Prepare for Go-Live: Make sure your team and equipment are ready ahead of the port date.
- Porting Day Execution: Your provider will closely monitor the porting process, ensure all numbers activate on schedule, and support live testing. Key staff should verify inbound and outbound call functionality immediately. If any issues arise, the porting team can intervene in real time to minimize disruption.
Throughout this process, your provider should keep you informed, ideally through regular status updates, reminders about upcoming port dates, and alerts on any potential issues that might impact your timeline. They should also assist in troubleshooting rejections and coordinate timing to ensure a seamless transition with no service gaps.
Why Port Requests Get Rejected and How to Avoid It
Port requests can be denied for several common reasons, many of which are preventable with the right preparation:
- Misspelled or mismatched account name
- Incorrect service address or account number
- Wrong BTN or PIN code
- Outdated or unauthorized user
- Missing documentation or incomplete LOA
Even minor typos can lead to frustrating delays. One client’s port was rejected because the authorized user was a former employee no longer at the company. In another case, We even had to intentionally misspell information on the LOA to match legacy billing records, because accuracy means matching what’s in the losing carrier’s system, not necessarily what’s “correct.”
Always double-check your information against the invoice, and be ready to involve someone from your team who can contact the current provider if needed.
How to Avoid Downtime When Porting Numbers
The number one concern during any port is downtime. Here’s how we keep your business connected every step of the way:
- Parallel Setup: We install new VoIP phones alongside your current system when possible, so both are operational during the cutover window.
- Prioritize Key Roles: We ensure key staff, like receptionists or managers, are connected before initiating the port.
- Call Forwarding Options: Temporarily forward calls to mobile phones or backup numbers to prevent missed connections.
- Mobile App Access: Enable remote teams or traveling employees to receive calls using the VoIP mobile app.
- Auto Attendant Coverage: Deploy a recorded greeting that routes or informs callers during brief transitions.
Even if there’s a short delay on some devices, we design the rollout so the business as a whole stays reachable. For larger offices, this might involve staggered cutovers or extended testing ahead of the final switch.
Tips for a Smooth VoIP Number Porting Experience
Want your port to go off without a hitch? Here are some tried-and-true best practices:
- Start Early: Porting takes time. Begin planning at least two weeks in advance, ideally more.
- Assign a Contact: Have someone available who can communicate with your losing provider if issues arise.
- Validate Everything: Cross-check all data, especially names, addresses, and account numbers against your invoice.
- Document the Details: Keep a running checklist and share it with your IT team and provider.
- Communicate the Plan: Make sure your team knows what to expect, when changes will happen, and who to contact.
These small steps dramatically reduce the risk of delays and ensure a coordinated, confident rollout.
Final Checklist Before You Submit Your Port Request
- Latest invoice from current provider
- Accurate account number and service address
- Matching account name and authorized user
- Billing telephone number (BTN)
- Clear list of numbers to port (and any to exclude)
- PIN code, if required
- Signed Letter of Authorization (LOA)
- Target port date aligned with install schedule
Once these boxes are checked, your provider can proceed with submission and coordination. Keeping this checklist handy helps prevent missed steps and more importantly, helps ensure your porting process stays on track without triggering unnecessary downtime or service interruptions.
A Clean Port Starts With a Clear Plan
Switching VoIP providers doesn’t have to mean dropped calls or downtime. With the right plan, the right info, and the right partner, you can make a clean, confident transition without missing a single customer interaction or putting your operations at risk.
At TeleCloud, we don’t just process port requests, we walk you through every step, troubleshoot the roadblocks, and make sure your phones work the moment you go live. From the initial audit to the final connection, our team is here to make sure you stay connected, compliant, and in control.
Let’s make sure your next move is seamless. Schedule a free consult with a TeleCloud expert today and discover how simple number porting can be when it’s done right, from start to finish.
Commonly Asked Questions
What happens if my port request is rejected?
You’ll receive a reason. Fix the error (e.g., wrong name or PIN) and resubmit with corrections.
Can I port numbers from different area codes?
Yes, in most cases. Your provider may need to submit multiple LOAs.
What if I miss the port date or the LOA isn’t signed in time?
The port will be delayed. Always confirm signature and availability ahead of time.
Can I keep my old system as a backup during the port?
Yes. Running both systems in parallel is a great way to ensure continuity.
Do I need to notify my current provider?
No, your new provider handles the request. But be prepared to contact them for info like PINs or authorizations.
Topics:


